USB-C Charger Not Working? A Troubleshooting Guide
Check a USB-C charging failure safely, isolate the charger and cable, follow Apple's iPhone steps, and decide when to replace an accessory or seek service.
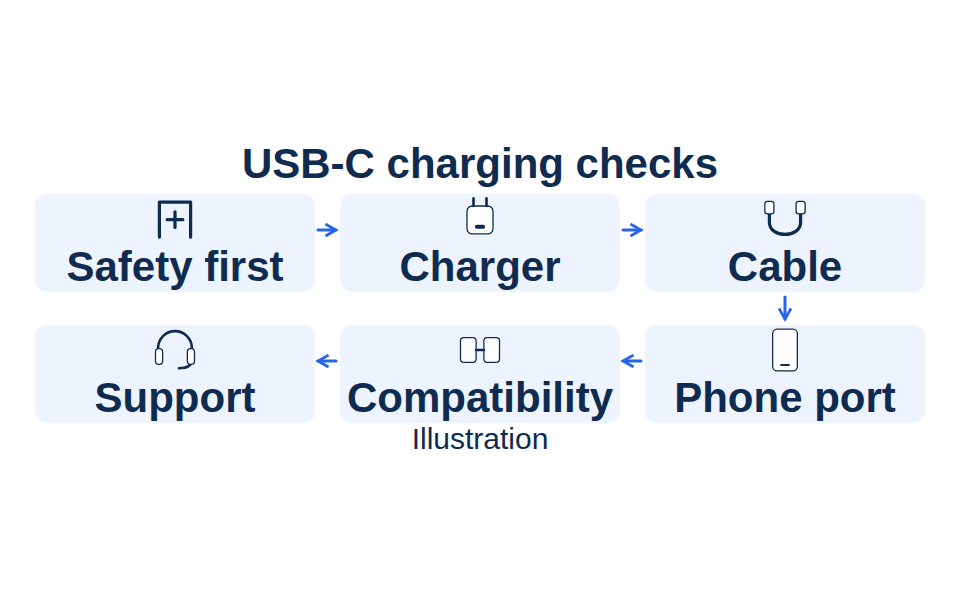
Replacing the wrong accessory wastes money and leaves your phone uncharged. If a USB-C charger is not working, first check for damage or moisture, then compare a direct connection using a compatible charger and cable, changing one item at a time.
For a dry phone and undamaged accessories, the useful question is which change restores charging: a different outlet, adapter, cable, or connection. A result identifies a lead to investigate, rather than proving an internal component has failed. Read the phone’s alert before swapping anything; liquid warnings and suspected damage take priority over troubleshooting. This guide covers phone charging, including Apple’s USB-C iPhone steps, and helps you choose between a setting check, an accessory replacement, and manufacturer support. It is compiled from official documentation, not our own fault-reproduction tests.
Keep these distinctions in mind:
- No charging response, intermittent connection, and slow charging need different follow-up checks.
- A reference accessory should be known to work with your exact device, not merely have a fitting plug.
- Change one part of the setup, then record the result before the next change.
- Stop accessory tests when there is damage, moisture, or a connection that requires force.
Our Charging & Power guides cover the related compatibility decisions after you have identified the symptom.
Before testing: stop for damage or moisture
Do not use a visibly damaged charging accessory as a test item. Apple’s iPhone safety instructions identify damaged adapter prongs, frayed cables, liquid exposure, and an adapter enclosure damaged by a drop as reasons to stop using the adapter and cables. They also say to discontinue iPhone use if device or battery damage is suspected.
A liquid alert belongs on a separate branch. Apple instructs users to disconnect the cable from both the phone and the adapter or accessory, and reconnect only when the phone and cable are completely dry. Its liquid-detection guidance rules out external heat, compressed air, objects inserted into the connector, and rice. Follow that page for drying and retry instructions; do not override the warning as an ordinary troubleshooting step.
Before building a reference setup, inspect the unplugged accessories. Exclude anything with a damaged housing, damaged plug, or visibly damaged cable. A suspect accessory should go to its manufacturer’s support or replacement process, rather than another phone for a cross-check. A different charging method does not make suspected device damage safe.
Takeaway: Damage and moisture are stop conditions, not extra variables to test around.
Step 1 — Establish a direct charging baseline
Start with the simplest documented setup for the phone: a working wall outlet, a compatible power adapter, and a compatible cable connected directly to the device. Keep hubs, intermediate adapters, and other accessories out of the initial comparison. Record whether the screen shows no response, a charging indication, repeated disconnections, or an explicit warning.
Google’s Pixel troubleshooting guide recommends checking the outlet, secure connections, the case, and the charging accessories. Use your own phone maker’s instructions for model-specific settings and restart procedures. A black screen is an observation to report; it does not establish that the wall adapter has failed.
Write down the phone model and the adapter port being used. If the source is a power bank, begin by establishing whether the problem also occurs with the documented wall-charging setup. The power-bank input and output guide can help interpret a bank’s port labels, but bank operation introduces another source-specific question.
For an intermittent problem, describe when it happens without deliberately flexing a suspect plug. “Disconnects while resting on the table” is a more useful record than “charger broken.” For slow charging, preserve the exact on-screen message and approximate battery level before moving to the compatibility check.
Takeaway: Create a direct baseline and name the symptom before replacing parts.
Step 2 — Isolate the charger and cable
Compare accessories one at a time, keeping the phone, outlet, and connection method the same. Google’s official Pixel steps include trying another cable or adapter and charging another device with the original pair. The matrix below is our way of organizing those checks; its outcomes are diagnostic clues, not measurements from a Tech Gadgets Now test.
Choose reference accessories whose compatibility with the phone is documented and whose operation is known. First establish that a complete reference pair charges the phone. Starting from that successful pair, introduce only the original adapter, record the result, and restore the reference pair. Then introduce only the original cable. If the reference pair does not charge the phone, it cannot serve as the successful control for those comparisons; move to the device-specific checks instead.
Scroll horizontally to see all columns.
| Starting setup | Single change | Observation and lead | What remains unresolved |
|---|---|---|---|
| Successful reference adapter + reference cable, same phone and outlet | Substitute only the original adapter | If charging stops, investigate the original adapter or its compatibility | Whether it is defective or offers the wrong mode |
| Restore successful reference adapter + reference cable, same phone and outlet | Substitute only the original cable | If charging stops, investigate the original cable or connection | Cable damage versus a compatibility or fit issue |
| Safe original adapter + original cable | Connect another compatible device | If that device charges, the pair works with that device | Whether it meets the first phone’s requirements |
| Successful reference pair | Introduce one original accessory as above | If charging continues, no failure was reproduced in that comparison | An intermittent problem or an interaction between original accessories |
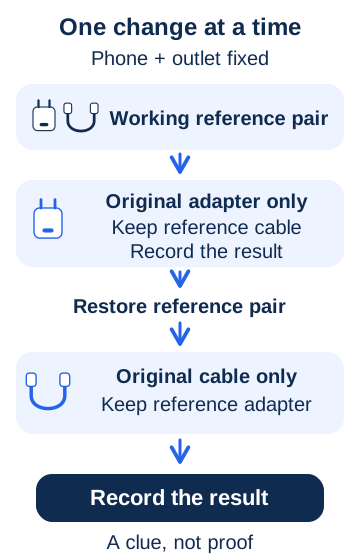
Common mistake: Replacing the adapter and cable together, then declaring the old adapter faulty. The combined change cannot separate the two accessories.
If the result points toward the cable, use the USB-C cable checklist to verify the intended charging connection before buying a replacement. If it points toward adapter compatibility, the GaN charger specification guide explains how to read the relevant output and port information.
Takeaway: Record which single substitution changes the result, and keep the conclusion narrower than “this part is definitely broken.”
Step 3 — Check the fit and the phone port
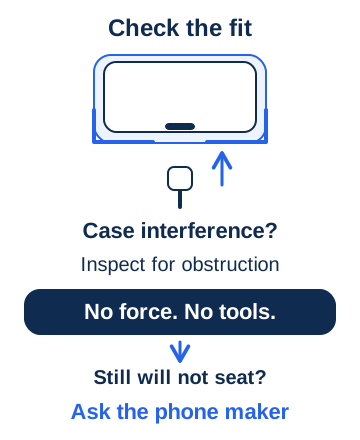
Inspect the connection without forcing it. Google’s Pixel guidance includes removing a case that interferes with the charging plug and checking the port for dust or lint. Apple’s charging guidance also calls for a debris check. Neither instruction justifies guessing at a cleaning tool or scraping a connector based on a forum tip.
Compare the plug’s seating with and without a removable case, if the device is otherwise safe to handle. If the plug still will not seat, falls out, or charging requires holding it at an angle, stop the fit test and ask the phone maker how to proceed. Record whether the same symptom occurs with a compatible reference cable. That observation helps support distinguish an accessory question from a device inspection request.
For a wet iPhone connector, the no-insertion rule comes directly from Apple’s liquid guidance. For a dry but obstructed port, this guide provides no do-it-yourself cleaning method: consult the manufacturer, especially when the available instructions do not specify a safe procedure. The cable guide’s connection checks are useful for matching accessories, not for repairing a socket.
Takeaway: A plug that needs force calls for a fit or service decision, not more aggressive insertion.
Step 4 — Separate compatibility from charging speed
Check compatibility after establishing safe, stable connections. USB-C is the connector; USB Power Delivery is a power-management protocol, and PPS is a feature used by supporting equipment. A plug that fits, or a charger that works with another device, does not establish the charging mode available to this phone.
USB-IF’s Power Delivery overview describes power management around the device’s needs. Its PPS charging initiative explains that equipment must support PPS to use that feature. Those facts support checking the whole connection, rather than diagnosing a dead adapter from a missing fast-charge label.
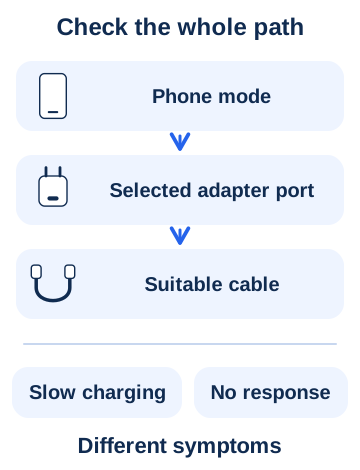
Read the phone’s official accessory requirements alongside the adapter’s selected-port specification and the cable’s stated capability. If another device is connected to a multiport adapter, record that setup and consult the maker’s allocation information. Test the phone alone as a simpler comparison; do not assume any particular sharing behavior without that adapter’s documentation.
Our USB PD explanation covers negotiation; the PPS compatibility guide covers the optional feature. Missing PPS may explain why a particular supported fast mode is unavailable. It is not, by itself, proof that the phone cannot charge at all.
Common mistake: Treating a missing fast-charging mode as the same failure as no charging response. Record what the phone actually displays before choosing the next check.
Takeaway: Confirm the documented mode for the exact phone and port; keep slow charging separate from complete failure.
iPhone USB-C charging: follow Apple’s sequence
Apple identifies iPhone 15 and later as USB-C models and permits standards-compliant cables and adapters from Apple or other manufacturers. Its USB-C connection guide establishes the accessory baseline. Use the following documented sequence for a dry, undamaged USB-C iPhone that still will not charge or turn on.
After checking the accessories, wall connection, and port, Apple’s charging troubleshooting instructions say to allow 30 minutes of charging. If the phone remains off or shows the battery symbol, quickly press and release Volume Up, then Volume Down, then hold the side button until the Apple logo appears. Allow another 30 minutes of charging; persistent failure may require service.
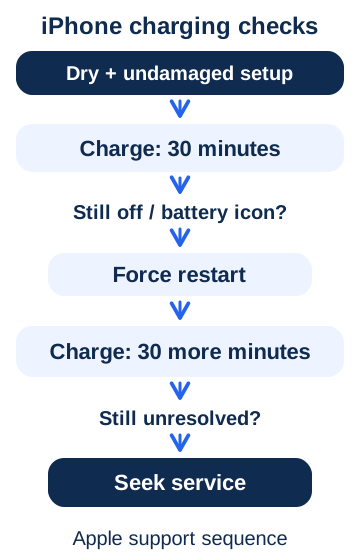
For an unsupported-accessory alert, Apple recommends a direct connection, accessory substitution, restarting, and checking for current iOS software. An 80% charging stop can instead relate to optimized charging or temperature; supported iPhones also offer a configurable charge limit. Read the displayed status and Apple’s linked guidance before treating a paused charge as adapter failure.
Takeaway: Use Apple’s sequence and alert-specific branch rather than repeating arbitrary plug-and-unplug cycles.
When this does not apply
These substitution checks apply to safe external phone-charging connections. They cannot identify an internal battery, charging circuit, or connector fault with certainty. They also do not replace a manufacturer’s procedure for a deeply discharged device, a liquid alert, suspected damage, or a device that remains unresponsive after its documented checks.
Laptop USB-C charging, dock power delivery, and operating-system controller resets require their own model-specific instructions. Do not apply a community laptop reset to a phone. This article also does not cover opening an adapter, modifying a cable, or repairing a charging socket.
Wireless charging is a separate path. Apple’s liquid guidance permits using a Qi-certified wireless charger for a wet-connector iPhone when the back is dry; that is not permission to keep using a device with suspected damage. A wireless success also does not isolate the cause of a wired failure. Our Qi2 and MagSafe explanation covers that accessory branch.
Takeaway: Move to model-specific support when the problem falls outside safe external comparisons.
Decide what to replace or report
Use the observations to choose a next action. A damaged accessory should stay out of use. A safe original accessory that repeatedly fails where a documented reference works warrants an accessory support or replacement inquiry. A phone that fails with the compatible reference setup, or has an unresolved fit problem, warrants device support.
Prepare a short record before contacting the manufacturer:
- Phone model, software version, and the exact alert, if any.
- Adapter model, selected port, and whether other devices were attached.
- Cable identification and any intermediate equipment removed for the direct check.
- Which reference combinations charged the phone, and which did not.
- Visible damage, moisture warnings, fit problems, and the official restart steps already completed.
For example, report “the reference adapter and cable charge this phone; the original adapter with the reference cable does not.” That is an illustrative reporting sentence, not a test result. It gives support more useful information than a conclusion about a failed internal component. Do not continue unsafe tests just to complete every line of the record.
Takeaway: Report the changed component and observed result, then let the appropriate manufacturer resolve the remaining uncertainty.
FAQ
How do I reset my USB-C port?
Use the phone maker’s restart instructions. This guide does not prescribe a universal USB-C port reset. The iPhone sequence above is a device restart, not proof that a connector has been electrically repaired. Laptop controller-reset advice is outside this phone guide.
Do USB-C cords go bad?
They can become damaged; Apple explicitly warns against using damaged charging cables. An intact appearance alone does not settle the question. A compatible reference-cable comparison provides a lead, while a visible break or frayed jacket is reason to stop using that cable.
How can I fix a USB-C charger?
First distinguish an outlet, connection, cable, or compatibility problem using the checks above. A result that points toward an adapter calls for manufacturer support or replacement. This guide provides no procedure for opening, soldering, or rebuilding a mains-powered charger.
My iPhone isn’t charging via USB-C. What can I do to fix this?
Begin with the safety branch, then use the direct connection and Apple’s timed restart sequence above. Preserve any liquid or accessory alert: it changes the next action. If Apple’s checks do not restore charging, use its service link rather than repeating the same test indefinitely.
Why does the USB-C plug keep falling out of my phone?
Record whether a case prevents seating and whether a compatible reference cable behaves the same way. The symptom alone cannot identify wear or debris. Stop if normal seating is impossible, and request manufacturer inspection instead of holding or wedging the plug in place.
Why won’t my USB-C plug go in all the way?
Case interference, an obstruction, or a damaged connection needs checking rather than force. Compare without a removable case if safe, inspect visually, and consult the device maker if the issue remains. This article does not authorize picking material out of the socket.
Takeaway: Use the observed symptom to select a documented check, not an improvised repair.
Method and sources
This guide is an editorial troubleshooting aid compiled from public primary sources, checked October 8, 2026. The substitution matrix and reporting checklist are our organization of documented checks; they do not represent hands-on tests, confirmed fault rates, or a guarantee that swapping an accessory will solve a problem.
Manufacturer support pages govern their own devices. We use them to distinguish a safe comparison from an alert-specific procedure, and keep Apple’s timed steps within the iPhone section. USB-IF supplies the protocol context, not a diagnosis for an individual charger. Follow the current documentation for your exact model when instructions differ.
- Apple: iPhone charging troubleshooting — connection checks, timed restart sequence, and paused charging; published December 9, 2025.
- Apple: liquid-detection alerts — wet-connector restrictions and drying guidance; published October 30, 2024.
- Apple: USB-C connections on iPhone — USB-C model scope and compliant accessories; published September 17, 2026.
- Apple: important iPhone safety information — accessory damage, moisture, and suspected device damage.
- Google: Pixel charging troubleshooting — case, outlet, and accessory substitution checks.
- USB-IF: Power Delivery overview — device power management.
- USB-IF: PPS charging initiative — feature compatibility requirements.
All sources accessed October 8, 2026. Initial version: safety branch, substitution matrix, iPhone sequence, and support record added on that date.
Takeaway: Treat the guide as a recordable decision path and the linked manufacturer instructions as the authority for your device.
Related reading
- USB-C cable guide — check a replacement cable’s intended charging and data capabilities.
- USB Power Delivery explained — understand why connector fit and negotiated power are different questions.
- PPS charging guide — check an optional fast-charging feature without assuming every phone needs it.
Takeaway: Use the deeper guides after the symptom has identified which compatibility question remains.
Related articles
USB-C Power Delivery Explained: What a Charger Can Actually Do
USB-C Power Delivery is a charging protocol, not a promise that every USB-C charger, cable, and device will work at full speed.
Read article
What Is PPS Charging? A Practical USB PD Guide
Equal wattage can still hide a PPS current mismatch. Match the phone mode, charger PPS voltage/current range and cable current rating.
Read article
Camping Power Banks: Capacity, Weight and Solar
Plan a camping charging kit from daily energy use, carried weight and realistic solar conditions, with a worked Wh budget and pre-trip checks.
Read article